Wednesday, 26 October 2016

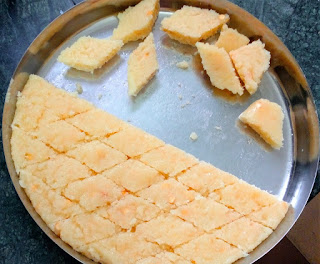
Thengai burfi / Coconut burfi

    
 For the third and final day, I've selected yet another traditional sweet - yummy and chewy coconut burfi.  As children, this used to be our evening snacks when we came back from school. We could eat as much as we wanted without any guilty feeling of gaining weight like now. We loved them. The easily available ingredients and being easy to prepare, makes it possible to make it often. This, like sesame seeds laddoo, you will not find in sweet shops (different variety is available). My granny and mom used to make this very often but I learnt it from my sister when she visited our place. All thanks to my grandson, I'm learning how to make our traditional sweets so that he can also enjoy what we enjoyed as kids. Now for the recipe.

INGREDIENTS;
1. Sugar - 1/2 kg
2. Roasted gram - 2 tablespoons
3. Grated fresh coconut - 1no
4. Ghee - 100 ml
4. Cardamom - 4 nos
5. Water - as needed

METHOD:
1. Grease a tray with ghee and keep it ready.
2. Put the grated coconut in a blender and pulse it for a few seconds (should be coarse).
3. Take a heavy bottom pan/kadai add sugar and just enough water to cover the sugar and bring it to a boil.
4.Once it starts boiling, add a spoon of milk and keep simmering. Remove all the impurities floating on the top.
5. Add the grated coconut and cook for a few minutes on a medium heat. Then add half the ghee stirring all the while.
6. Keep adding the left over ghee little by little as you cook till the mixture starts foaming. 
7. Add the roasted gram and cook till it starts leaving the sides of the pan.
8.Remove from the heat, pour it into the greased tray and let it cool.
9.Once cooled, cut into desired shape and serve.


Tuesday, 25 October 2016

BM 69 Indian sweets. Karai Kacchayam

Abi's li'l hands grabbing the goodies!
      
   Though we like sweets, we don't enjoy the market sweets that much. Traditional and homemade sweets are the most favorite ones. Of these, our traditional sweet called kachayam is a big family hit. We make two types of kachayam. One is made out of rice flour and sugar syrup. The process is more tedious. The second one is called karai kachayam. Karai means mixing. This is easier and instant and made by mixing all the ingredients nicely. Hence the name. Both taste fantastic. Here I'm making the second variety. 
     Every time I make this, time rewinds in my mind and brings some sweet memories. Once we visited my MIL 's sister's place, unannounced as newly married. She was too excited and anxious as it is believed the new bride has to be given sweets on her first visit and there was no sweet shop nearby. So she made this quick sweet with so much love and it tasted like heaven, something which I've not forgotten even after many decades. In fact, I learnt it that day. So I dedicate this to her.  Now to the recipe. 
                       
Ingredients:

Wheat flour   - 1 cup
Maida / All purpose flour -2 tablespoons
Ripe banana  - 1
Sugar   - 1/2 cup ( or to taste)
Grated fresh coconut - 3 tablespoons (optional)
Green cardamom   - 5 Nos
A pinch of cooking soda
Ghee/ oil for frying

Method:
1. Mash the banana well in a mixing bowl.
2. Add in all the other ingredients except oil.
3. Add water a little at a time to make a smooth batter. The batter should be of pouring consistency.
4. Make sure there are no lumps in it.
5. Heat ghee in a pan, bring to medium heat and pour a spoonful of batter into the hot oil. (You can pour 4 or 5 kachayam in one go depending upon the size of your pan).
6. Fry on both sides till they become golden brown.
7. Lift one at a time, press it in between two steel ladles to flatten them and also strain the excess ghee out. (Need to do this quickly so as to remove all of them without burning).
8. You can, of course, serve them hot or even cold (room temperature).

Check out the Blogging Marathon page for the other Blogging Marathoners doing this BM#69

Monday, 24 October 2016

Sesame seeds laddo / Til ka laddo / Ellurundai

  
   Ellurundai / til ka laddo is a traditional Indian sweet. In South India, we make these laddoos with black sesame seeds and considered as poor man's delicacy in olden days. But not anymore. Nowadays, people don't make it the traditional way and you don't get it in the sweet shops also. Making the laddoos the traditional way is a bit difficult now as we need the traditional pestle and mortar for pounding. Instead we make do with the mixer grinder now. The traditional way of making tastes so much better without any doubt. But when you crave for these laddoos even the substitute tastes great. So for those of you with a sweet tooth,this one is a must try. Here comes the recipe.


INGREDIENTS:
1. Black sesame seeds: 1/2 kg
2. Jaggery / Karuppatti: 1/2 kg
3. Fresh coconut: 1 no

METHOD:
1. Clean and roast the sesame seeds till nice aroma comes and let it cool.
2. Grate the coconut and Karuppatti and keep them ready.
3. Divide the sesame seeds, jaggery and coconut into 2 or 3 equal portions. Put one portion of the sesame seeds in the mixer and grind till coarse.
4. Add one portion of the jaggery into coarsely ground sesame seeds and run the mixer for a few more minutes.
5. Now roast one portion of the grated coconut till it turns light brown and nice aroma comes. Add it to the ground sesame seeds and jaggery while it is warm (not very hot). Run the grinder till all the ingredients are well mixed.
6. Repeat the process till all the ingredients are used.
7. Put all the portions of ground ingredients in a mixing bowl and mix them well with a spoon.
8. Take small portion of the mix and shape into laddoos while still warm. If the mixture becomes cold, it can be heated up on a low heat.
9. Cool the laddoos and store them in a container. The taste improves after a day or two.
10. One must keep in mind that while running the grinder the load becomes more. Take the portions according to your grinder's capacity.

Check out the Blogging Marathon page for the other Blogging Marathoners doing this BM#69

Wednesday, 19 October 2016

Pickled bitter gourd

.
   The pickled version of bitter gourd is my final post for the topic of shelf life dishes. It is a very good substitute for spicy and oily pickles and therefore very healthy. One doesn't need to add too much spice or oil to prepare this sweet / bitter, tongue tickling dish. It can also be stored for months in the refrigerator. 

   This one is always available at my mom's place as my father likes it very much. During summers, my parents prefer ragi , bajra, dalia or any millet varieties of porridge with curd and pickled bitter gourd for breakfast. It can also be served with curd rice. A very simple and easy to make dish. I learnt it from my mother. Here is the recipe.

INGREDIENTS:
 Bitter Gourd - 2 nos
Tamarind - a lemon size ball
Jaggery / sugar - 2 to 3 table spoons
Green chillies - 4 nos
Turmeric powder - 1/4 tea spoon
Oil - 1 table spoon
Mustard seeds - 1/2 tea spoon
Curry leaves - A few
Salt to taste

METHOD:
1.Wash and cut the bitter gourd into 1/2 inch circles. Slit the green chillies.
2.Heat oil in a pan, add the mustard seeds and let them splutter. Add curry leaves and green chillies. Saute for a minute. Now add the bitter gourd and fry for 2 minutes.
3.Take out tamarind juice before hand and add a cup of water to it. Pour the juice into the bitter gourd. Add salt and turmeric powder and let it boil. Reduce the heat and cook till half done.

4. Add jaggery/sugar, adjust water and cook on slow heat till water dries up and it looks like pickle. (not too dry nor watery)
5.Cool and store in a dry jar and use as required.
6. Chillies, tamarind and sugar can be adjusted as per one's taste.

Tuesday, 18 October 2016

Curry leaves podi


   Though I was not planning to make this podi as it is difficult to get curry leaves in Rajasthan. But when we moved into our new house, the first thing I did was to see the backyard for any chance of finding a curry leave tree. Wow! Indeed their is one. So the first thing that came to my mind was making this podi for this month's BM. This goes very well with softly cooked plain rice and ghee and not to forget the nutrients it provides being rich in iron. So here it is.

INGREDIENTS:

Curry leaves : 1 handful/ bunch

Toor dal : 2 table spoon

Urad dal (black or white) : 2 table spoon
Red chillies : 3 nos
Oil : 1 teaspoon
Hing/ Asafoetida : a pinch
Salt to taste

METHOD:

1. Dry roast both the the dal and the red chillies.

2. Wash the curry leaves and let them dry naturally for a few hours or under the fan.

3. Heat oil in a pan and fry the curry leaves till they are crispy. 
4. Add salt and hing to the roasted ingredients and grind to a coarse powder and keep aside.
5. Now grind the fried leaves till coarse. Add the coarsely ground dal powder and run the mixer for a few more seconds. Can use push button at this stage. The end product should be coarse. 
6. Serve with hot rice and ghee.


For more recipes on shelf life, check out the Blogging Marathon page for the other Blogging Marathoners doing this BM#69

Monday, 17 October 2016

Peanut Butter

    
   I'm sure, those who have already made this would agree with me that this is one of the easiest, quickest and tastiest dishes without any argument. This one is a favourite in our home. It gets over as soon as it appears on the dining table. It is always on the top of shopping list planned or unplanned. So I was looking for a recipe to make it at home. I went through many of them and finally made it in my way. Most of them are same barring a little change in sweetening agent and grinding. It came out so well and every one liked it and now is very much in demand. Here goes the recipe.


INGREDIENTS:

1. Ground nut -1 cup
2. Any vegetable oil - 1 tablespoon
3. Honey - 1 teaspoon 
4. Salt to taste (1/2 tea spoon approx) 

METHOD:

1. Roast the ground nut in a pan on medium heat till the outer layer is brown and black spots starts appearing. Let it cool to room temperature and rub the nuts with both your hands lightly to remove the skin.
2. Put the cleaned nuts in a mixer grinder and run the mixer using the push button for a few minutes till the nuts are coarsely ground.


3. Add oil, honey and salt and grind further till the required consistency (fine paste or with granules for crunchy texture). I made one with granules.

4. Store in an air tight container. No need to refrigerate for 15 to 20 days (it will vanish before that :)


Related Posts Plugin for WordPress, Blogger...